Creating online data forms with no coding at all
Many times you need to collect information from users (e.g. employees) through online forms.
As I just did for my HR department as a favor, you too can do it very quick (but not dirty) in Zoho Creator.
I assume that you have a basic understanding of Zoho Creator and databases in general. If not you can have a look at the Wiki site, or more generously check out the respective chapter in my book Foundation Zoho: Work and Create Online, out September 2009.
Creator allows you to quickly setup a database by designing the data forms, and then embed the forms in any web page. It means that you skip many steps (compared to when you do such task in a traditional way of coding everything yourself) and let Creator to take of it. You might realize the skipped steps in this tutorial, and well, if you didn’t, don’t bother.
Now, let’s create a database application that holds the data of a survey you run on your website.
Getting started
First you need to create the application itself. Then we continue with adding the necessary forms.
- Open Creator (http://creator.zoho.com) and log in with your Zoho credentials. Create an account if you don’t have one yet.
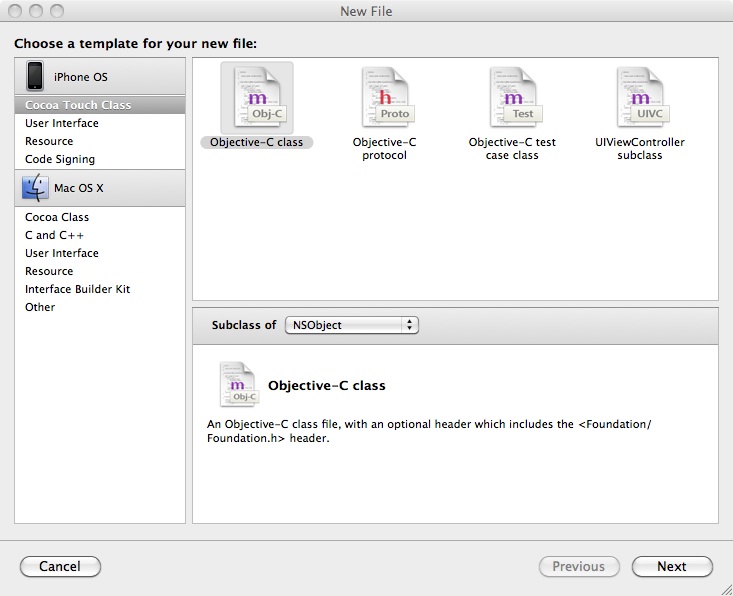
- If it is your first time it will automatically open the application wizard (figure 1) where you create the application. Enter webForms in the Application Name and survey in the Form Name.

figure 1. Creating the application.
- In the form designer (figure 2) you can create a full-fledged data entry form with standard elements, coding, and validation. This tutorial will just use the design features, so start with dragging a Radio button from the field-box (left) and dropping it on the form just like in figure 3.

figure 2. The form designer.
figure 3. Dragging a radio button.
- Fill in the values in the Adding Radio dialog box as you see in the figure 4. Then click done when you are finished. These elements will determine the design and basic behavior of the radio button.

figure 4. Setting the values for the radio button. - Check the result of the previous steps on the form. You can see a radio button set with 3 options to select and a label in the form of a question. The first element of your form is built and we are going to perform similar tasks for the rest of the elements.
- Now add a Checkbox to the form: drag it from the field-box and drop it on the form below the radio button.
- Fill in the values for the check-box as in figure 5. Then click done.

figure 5. Setting the values for the check-box. - Drag and drop a Multiline and fill in the values as you see in the figure 6.

figure 6. Setting the values for the multi-line.
- For the last field, drag and drop an Email and set it just like figure 7.

figure 7. Setting the values for the email.
- Check the final form and compare it to figure 8. They should look almost identical.

figure 8. Reviewing the final design.


Well, you have just created your very first form. It’s now time to run it and test how it works. Then you will embed it in your website for the prime time.
Getting the embed code
To refresh your memory let me mention that to place the form in your website in order to gather information from the visitors, you need to embed the survey form in a web page of your website. Although you won’t write a single line of code, it is always beneficiary to be a bit familiar with HTML, maybe to that extent that you know every web page is made of HTML code. So all you will do is to get a piece of HTML code (snippet) and paste it in the right position in the source code of the target web page.
Before that, you need to run the Creator application, webForms. Until now, you were in design mode, creating the pieces of the application (well, just a form so far). Running an application on the other hand, is like executing a standard application where you can interact with different parts of it, enter and retrieve data.
- In design mode (you are already there) find the big yellow button, Access this application and click it. The application will open in the run mode and all design elements will be replaced with a good looking environment waiting for you to enter data.
- On top of the form, next to its title, click the More Actions menu and select Embed in your Website (figure 9).

figure 9. Starting the embed process. - Click Click Here in the next dialog box (figure 10) to have access to the form without needing Zoho credentials (while entering data) and then copy the code snippet (to the clipboard).

figure 10. Reviewing the final design.


Embedding the form
You have generated a embed code that loads the form designed in Creator anywhere in the body of the web page you paste it. Such web page could be a post or a page in your blog, or in any website that you have the rights to add HTML content to.
Here I am just going to demonstrate how to embed our Creator form in a WordPress page. Other blogs (Blogger, MovableType, etc.) or CMSs (Joomla, Drupal, etc.) will follow a similar approach with some difference in the details. The point is to paste the code snippet in a HTML body.
- Login to your website (WordPress, in here) admin area.
- Add a new page (Pages > Add New) and enter a title as well as some body text.
- Turn the editor to HTML view where you can see the underlying code.
- Paste the code snippet in the HTML body in a suitable position. The outcome should look like figure 11.

figure 11. Creating a page with the form embedded. - Click Publish to save and publish the form.

Testing the form
To test the form you just need to open the container page. The page looks like other pages in your website with a form embedded in it. The Zoho logo appears at the bottom (in the free edition of Creator), but it is no big deal.
Try to enter some values in the form and click Submit when you are done.
If you skip a value that is mandatory (identified with a red asterisk) or enter wrong information (e.g. enter a number in email box) the form will show an error message asking you (the visitor) to enter data correctly (figure 12). It actually validates the values against the rules you have set while designing the form (figures 4, 5, 6, 7).

figure 12. Testing the form.
Web developers will be amazed by the features Creator provides out of the box. Easy interface design and validation plus many other features that are beyond the scope of this tutorial.
Now your visitors are able to participate in the survey and give their feedback using a form that you created in less than an hour.
But where will all that data go?
Extracting the data
Collecting data is not even half of the job. Behind the scene you need to extract the entered data to analyze it for whatever reason that is important form you.
The good news is that while you were busy designing your form, Creator made a View for that particular form by which you can extract the entered data. Views are like customizable portals to data. Although views are way more powerful than just showing you the data, but we just stick to one feature (viewing raw data) for you to see where the incoming data goes to.
In Creator, in the run mode, open the survey View from the sidebar (figure 13).

figure 13. Extracting data.
You can navigate through data, search, filter, and even export it to different formats. You may even embed this form in another web page, but I leave this to your imagination since you gained enough knowledge to do it yourself.
Congratulations, you have managed to create a simple, but powerful survey application with few clicks and no coding at all.
What next?
Creator is a powerful database application creation platform, that many call it the online Access. But I believe it is even more useful because it is cloud-based and allows you to create multi-user internet-based applications that can be used by SMBs and SMEs.
The webForms application, can have more forms for guest-book, feedback, inquiry, etc. In fact you can create a full-fledged data oriented website using a blogging platform and a database application hosted on Zoho Creator.
Don’t forget to checkout the Creator help to unleash its power and use it to solve real life problems.


Hello KathyHappy New Year!that software is neat — up til now I have used PHP Surveyor to carutpe database information.The only drawback I see of this software is that it shows the person’s email who is entering data. Can that field be removed or hidden?? I am just imaging all the spam I would get from my email being so readily available through this software??Hope to see you in 2007Jennifer